









Showing posts with label Blogger Plugins. Show all posts

gravatar

Animated Flash Tag Cloud For Blogger

"Blogumus" is an Flash based tag cloud widget which uses scripts converted from Roy Tanck's WP Cumulus plugin for Wordpress. I fell in love with Roy's original Cumulus plugin when I saw it, and simply had to learn how to convert this for use in Blogger powered blogs. The result is the widget you can see in action at the top of this post. Hover your mouse over the Flash object to see the animation begin. In this post, I'll explain how you can add Blogumus to your own Blogger layout with ease!

Update: Improved Widget Code

I have updated the code required to run this widget to activate links in the tag cloud Flash movie. If you have already installed Blogumus, please replace your widget code with the new updated code, or reference the additional lines to modify your existing installation.

How it works

This widget uses a combination of JavaScript and Flash animation to parse and display your blog labels. Once installed in your template, it should work "out of the box" without any additional tweaking required, though of course you may prefer to change the variables for color, background and size if appropriate :) You should also be able to move the Label Cloud widget through the Page Elements page of your dashboard if you prefer display in a different layout location. To see Blogumus in action, both Flash and Javascript must be installed and enabled for your internet browser. However, it does degrade relatively gracefully, and label links will still be clickable (though not animated) for those who do not use JavaScript of Flash (including search engine spiders).


How to install Blogumus in your Blogger layout

Installing Blogumus in your Blogger layout is surprisingly simple! You should only need to copy and paste a section of code to your Blogger template, though any tweaks for the style of display will require some manual editing. Here are the steps required to install Blogumus in your Blogger layout: Go to Layout>Edit HTML in your Blogger dashboard, and search for the following line (or similar):
b:section class='sidebar' id='sidebar' preferred='yes'>
Immediatly after this line, paste the following section of code:
b:widget id='Label99' locked='false' title='Labels' type='Label'>


Then preview your template. If installed correctly, you should see the tag cloud appear in your sidebar. Then you are free to save your template, edit the colors and dimensions as required, or move it to a different location. That's all!

Customizing Blogumus

In this default installation, Blogumus includes the following preset variables:
  • Width is set to 240px
  • Height is set to 300px;
  • Background color is white
  • Test color is grey
  • Font size is "12"
If you would prefer to make your widget wider, shorter, change the color scheme, etc, you will need to do this by editing various parts of the code. I'll go through these options in the order they appear in the widget code. Editing width and height The variables for width and height are found in this line of the script:
var so = new SWFObject("http://halotemplates.s3.amazonaws.com/wp-cumulus-example/tagcloud.swf", "tagcloud", "240", "300", "7", "#ffffff");
The width (currently 240) is highlighted in red, while the height (300px default) is highlighted in blue. These numerical values specify the width and height in pixels, so you can alter these of you prefer. Editing background color You can change the background color from white to any other color by altering the hex value in the same line:
var so = new SWFObject("http://halotemplates.s3.amazonaws.com/wp-cumulus-example/tagcloud.swf", "tagcloud", "240", "300", "7", "#ffffff");
For example, if you prefer a bright red background, you may replace #ffffff with #ff0000. Take a look at this page for a list of commonly used hex color codes. Alter the color of text By default, the text is set to display as dark grey ( hex value #333333). You can alter this variable in the following line:
so.addVariable("tcolor", "0x333333");
Be aware that "tcolor" is a Flash variable and doesn't include the usual hash symbol of hex color codes. Be sure to only replace the numbers! Adjust the font size The maximum font size of tags is specified in this line:
so.addVariable("tagcloud", "12'>");
You can alter this to ensure tags are displayed in a bigger or smaller font if you prefer by changing "12" to a larger or smaller number. While making any of these changes, you should be able to preview your widget and be certain that your new choice of color, dimensions and background are suitable for your needs.

Credits, support and requirements

Blogumus is based on the original WP Cumulus plugin by Roy Tanck, and was converted for use with Blogger layouts by myself. Please leave the credit links in the widget code intact. These will not be seen by the majority of your blog readers (as they will only display if JavaScript and Flash is not activated) but leaving these links intact is a great way of passing some link love on to Roy for all his hard work, and to inform other Blogger users that they can find the widget codes on this site.

Support/Issues

If you have any problems installing or using this widget, please leave your comments below or direct these to the Blogger Buster forums as Roy will be unable to provide support for installation in Blogger blogs!

Requirements

For Blogumus to display properly in your template, you will need to have Flash Player 7 or higher. You can download the latest Flash Player plugin for your browser from Adobe. I'm not sure that this installation will support special characters as tags (only Latin characters supported at present). If you do experiecce issues with labels displaying incorrectly, please let me know. I'll try to add more support, but have very little experience using Flash!

Your thoughts?

I hope that you enjoy using Blogumus in your own Blogger blogs! Please feel free to share or syndicate this page with your favorite bookmarking service if you think it is worth a mention, or subscribe to the newsfeed to learn of more great Blogger tutorials as they are posted.

gravatar

How to Create : Continue Readmore... link for Blog Post

This is a pretty popular Blogger hack that lots of people have asked me about. Instead of answering to each email individually, I thought it would make more sense to write an article about it.

With this hack, you can choose to display a select amount of text from the beginning of each post as a teaser instead of showing the entire post on the front page of your blog. Then when people want to read the rest of the post, they can click a “read more” link to see the full post. This is very handy if you have lots of long articles all on one page. (Note that you’ll need to have post pages enabled in order to make this feature work.)

Step #1 - Update Your Template Code

First you need to edit your existing code so I recommend copying and pasting it into notepad or any text editor. Also, it’s smart at this point to create a backup of your template just in case something goes wrong. Now do a search (CTRL + F) within the text editor for the following code post-header-line-1. This is the default code that Blogger includes but some custom templates remove or change this code so you might have trouble finding it. If you can’t locate this text then try searching for instead. Your template will for sure have this since it’s the tag that actually prints the body of your post.

Now depending on which code you were able to find will determine how easy the next steps will be. You might need to do some detective work first in order to get this working properly in your custom template. The idea is to get this new code into your template before the tag. Keep reading and hopefully the explanation will illustrate the concept clear enough so you are able to adapt this hack to your custom template.

Add the following code below the

and
tags if you’ve got both.


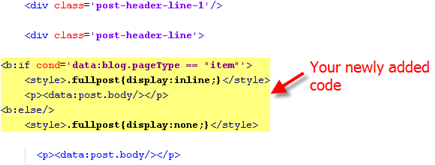
The result should look something like this:

new-code-block.png

If you don’t have the default

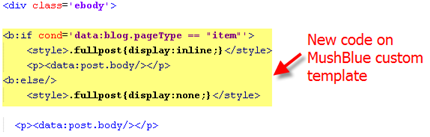
tag then your result should look something like this instead. This is how it would be done in the MushBlue Blogger custom template:

new-code-block-mush.png

Notice in both examples that the code in yellow and the tags are the same — it’s just tag above it that will differ based on the template you’re using.

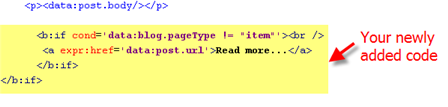
Now let’s add one more bit of code which will actually create the “read more” link in your post. This code will go below the tag so copy the following and paste it in. Feel free to change the “Read more…” text to whatever you want the link to look like. Be careful not to delete any other code during this process.


Read more...

Yes, there are supposed to be two tags in the above code so don’t think it’ s a mistake. The result should look like this:

new-code-block-2.png

This code will be the same no matter what template you are using. Just make sure it goes below the as shown in the image above.

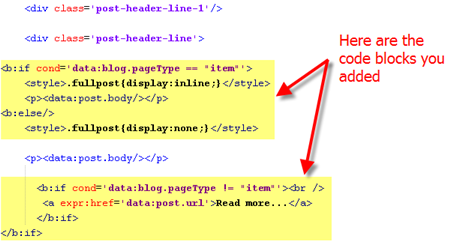
Now let’s look at what the final result should be. Here’s the updated code block you just worked on all put together:

new-code-block-3.png

Ok, you’re all done editing the template code. Paste it back into your Blogger html window and save it. If you get an error, you made a mistake. The most common mistake is to accidentally delete a > or <>

Step #2 - Add a Class Tag in Your Default Post Template

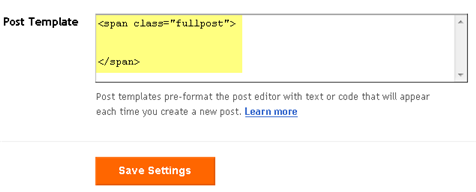
For this step, you need to navigate in your Blogger account to “Settings” => “Formatting” and scroll all the way down to the bottom. It’s the last option called “Post Template”. You’re going to paste in the following code:

You’ll want to keep the spaces in there which will make sense later. After you save this, it will look like this:

post-template2.png

Step #3 - Create a New Post

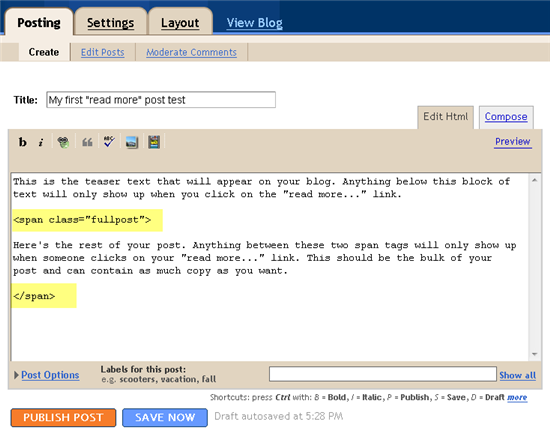
Ok, we’ve got everything all setup so it’s time to go and test it out. Hopefully you’ve got a new post in mind for your blog. If not, then we’ll just create a test post which you can later delete. When you click on the “Posting” tab, you’ll notice that the post text area is now pre-populated with the and tags. If not, then you didn’t save it properly so go back and re-read step #2.

So when writing your new post, anything you put above the tag will be the teaser text. The main body of your post needs to go in between the and tags in order for the “read more…” link to work properly. See the screenshot below. Sometimes pictures illustrate better than words.

post-template-result2.png

Now publish or preview your post to see the “read more” hack working on your blog. If it doesn’t show up for some reason, go back and run through the steps again. Most likely you pasted the code blocks in the wrong places. It’s difficult to troubleshoot these issues since each template can be unique so please make sure to double-check your template before asking for help in the comments section below.

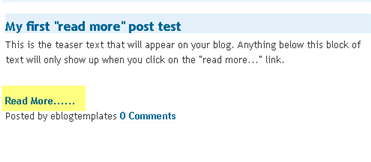
Here’s the live post with the “read more…” link properly working based on the text I used above in the post text area.

post-results.png

Additional Info

If you want to go back and update your old posts with this new “read more…” feature you can. Just go back and edit each post manually. Essentially you’ll need to paste in the and tags breaking apart the post into two parts.

For some posts, you might not want to use this feature at all. If that’s the case, just delete the and tags from within your new post text area. Then your new post will show up entirely just like it used to before you implemented this hack. Enjoy!

Source:

mOre

10 Best Free Download Managers 10 Best Websites Large files Sharing 2 Column Blogger Template 2 Columns 25 GB Space 3 Column Temlates 3 Column Templates 3 Columns 4 Column 4 Column Theme Add Button Adds Full Blogger Templates Adsense Earnings Adsense Tech Blogger Templates Arthemia Blogger Template articles Beautifull Blogger Templates Best Photo Sites Black Blogger Templates Blogger 3 Col Templates Blogger Plugins Blogger Styles Blogger Templates Blogger Templates-150 Blogger Tips Blogger Tricks Blogger Widget Blogger WP Templates Blogging BLOGY WEB 2 Business Charcoal 2 Column Blogger Template Charcoal Blogger Template Clean Dark Template Click Fraud Cloud Plugin Colorful Blogger Templates Colors of life Comfy Magazine Blogger Template Communist Template COMP2 Template Connexion Template content Content Sites Cool Sites Copy text CREATION Template Cute Blogger Templates Dark Blogger Templates Denim Templates Digg Button Dots Templates Download Managers Earn Money Elegant Entertainment Expandable Post Links Field of Drreams Template Firefox Firefox Addons Fixed width Flora Scent Template Flower Blogger Templates Foliage blogger fourWPTP Free Hosting Free Domain Hosting Free Domain Name Free Hollywood Movies free methods Free Online Tv Free Space Free Stock Photos free Storage Free Web Hosting Free web space Funky Zine Template Get Vist Aero Mouse Pointer for Win XP Gmail Google Adwords Google Pages Alt Google Rankings to Improve Gorzeous Blogger Templates Graffiti Art Template Harbor Blogger Templates How to Installing Templates How to Skip User Accounts login Screen and Boot Directly to Desktop in Vista ? Html -XML Installin xml Blogger Templates Instant Theme Creator Internet Tips Japanese Fleur Template Large Files Sharing Light Lightness Blogger Templates Magazine Style Template Maggo Magazine Template Mind Break Minima Templates Minyx Blogger Templates Monetize Money Making Moto Templates Multi column Template New Bloggers Nice Day Template Nitelife Template Online Creator Online Image Creator Online Money optimize Orange Paid to Surf Parse HTML Pay to Surf Pepper Template Photo Blogger Templates Photo Site Protonema Template Read more Plugin Related Post for Blogger Related Post Plugin Related Post Widget Restricted Website Right sidebar Rounded blue Rounded corners Rounder Templates seo Simpress Blogger Template Softwares submission Sys Admin Tab View Tabs 01 Template Tech News Tech Tips Techlure Blogger Template Template Create Templates Theme Creator Tic Tac Templates traffic Useful Templates Viral Marketing Web 2.0 website Website Tips White Word Press Themes Wordpress Premium Templates WordPress Templates Wordpress Themes WP Premium Xml Errors Yahoo Youthful Blogger templates Zanblue Template Zinmag Futura Zinmag Futura Blogger Template Zinmag Primus Blogger Template Zinmag Remedy Zinmag Remedy Blogspot Theme Zinmag Tribune Zinmag Tribune Blogger Template

Sponsor Ads

Who's Online